Last month, we covered using the sketchbook, mechanical pencil
and permanent pen. You’d be fine going out just using these three, not being
encumbered by other things. However, if you want to add an ink wash or some
color, it’s good to bring along a fountain pen, some portable watercolors and a
water brush.
Water-soluble pens
All fountain pens are water soluble that’s because the ink
is dye-based in a water-based solvent. I
have a great time with them, taking advantage of the smearing created by adding
water. What happens is that I use the line as a palette to create values in my drawings. I also use the water soluble pen to add some
more interest in a drawing. For instance, here’s a draw I did of Cardiff Castle
in Wales. I took advantage of the solubility of the ink to create shadows.

Traveling watercolor
paints
I don’t like to add too much color to my sketches, although
I‘ve been known to go overboard with color.
Usually though, I prefer to let the ink tell the story. When I do add
color I usually go with two types of products.
You can purchase pre-made palettes (no children’s sets, like
Prang or Crayola). The professional ones tend to be expensive, but they are
cool. Usually you get a small brush and a nice area to mix your colors. There are even sets that have their own little
water bottle.
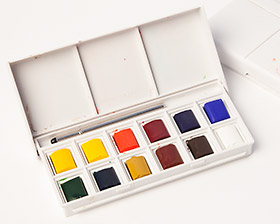
If you are going to go out and buy a watercolor set, I like
Winsor-Newton. While I would not recommend these paints (Cotman) for producing
fine art in the studio, their colors are good for on-the-go sketching, the size
is right and their painting cakes can be purchased online when you run
out. The set comes with plastic holders
that contain paint cakes. Both are loose. To secure them into the set, I glue
the holders with tacky glue such as Elmer’s and I wet the cakes and seal them
into the holders.
Since I’m a little nutty about staying small, I actually
create my own sets using weekly pill containers. Purchasing the three primary
and three secondary colors in tubes, I then fill the pill case with the paints,
leaving the middle one empty for some water if I need it.

The beauty behind using six colors is that I am able to
create as many colors as I want. It is estimated that we can create millions of
colors from just these six and they are usually cleaner, if done right. So no,
there’s no need to go out and buy 12 plus colors to meet your color needs. In
the end, though, both types of painting kits work.
The Waterbrush (see free video below)
One of the best inventions made for sketching was the
Waterbrush by Niji. All you have to do is fill the barrel with water and press.
Voilà, the brush is ready to go. As with all products, you can find others
offering similar brushes: Aquaflo (don't buy the real cheap ones) and Pentel.
With these brushes, there’s no need to carrying water around
with you. But be warned,

Water-soluble colored
pencils
Very often I will just grab a small set of watercolor
pencils and use them to add color. The biggest advice I can give here is don’t
buy children’s sets—stay away from anything that costs around $5. You ARE
getting what you pay for. Less pigment and more filler. I tend toward
Primsacolor or Lyra since they offer nice small sets. Besides they have soft lead and seem to go
farther with less.
I don’t use these pencils a lot in the field, but when I do,
I usually draw a small palette at the back of my book and use that to add a
dash of color. Are you old enough, like me, to remember those sets that came
with a drawing and a palette of color down at the bottom of the page??
Camera
Why bring a camera when you’re sketching? Aren’t we trying
to eliminate our dependence on cameras? No exactly. For one thing, I like to
take photos, period. When I’m someplace new, I want to capture those instant,
fresh images when you first get out of the car, off the train, bus or plane.
Those quick burst of excitement are easily conveyed by a camera, not so much by
sketching.
Secondly, I like to take a photo of what I’m sketching to
use later in my studio. Light changes every minute and by taking a photo before
and after my sketching session, I can modify—add or subtract—later in the hotel
room or when I’m back home.
Thirdly, a photo will help me to see things I didn’t see on
location. Sometimes you just don’t have a lot of time to study a building or a
farmers’ market. You’re on a bus or quickly passing by the town. A photo will
help you capture the details you may have lost in those passing moments. It’s a
great record-keeping tool.
Camping stool
I used to go out and just plop down anywhere, using my
jacket or sweater. I was usually hoping to find a bench or a good flat rock to
sit upon. Then one day I was visiting a town in England (Marlborough) that just
so happened to be on market day and just so happened to have a vendor selling
triangle stools. I fell in love immediately, but had to wait until I got back
to the States to buy one—my luggage weight wouldn’t allow anymore “goodies.”
My first stool was almost exactly what I saw in England, a
stool that has just enough room for me to sit on and is small enough to pop
into my luggage. This is the one I usually take with me on trips abroad.
For Stateside trips, I found one that is not only small with
a triangular seat, but even has a back to it and believe it or not, a cup
holder, which I use as a pencil holder. Best of all, it is light weight and
comes with a shoulder strap. I purchased it at our local variety/hardware
store.
YouTube Channel
I'm very excited to announce that I have a channel on YouTube that holds all my videos. I am continuing to create one a month and will include the new monthly video in this newsletter. But I thought you'd like to see the entire channel and/or share it with your friends--those who can't come to my classes or workshops because of other commitments. Here's the link: https://www.youtube.com/
Unfortunately, I'm not very good yet, so please excuse all the ums and ahs. As with everything, I will get better as time goes one.
This month's video: The Water Brush
What's Coming Up!
New Term Begins April 13, 2014
New Term Begins April 13, 2014
Studio Classes/6-Week Class Term
Register by email: jjgoodell@gmail.com
Please register by Friday, April 11, 2014
Register by email: jjgoodell@gmail.com
Please register by Friday, April 11, 2014
Drawing every Tuesday evening
Temporarily closed until Fall 2014
Temporarily closed until Fall 2014
The Sketching Atelier every Wednesday mornings
10 am to 12:30 pm* $80 per term
(please note: class time has been extended)
Still life and Mixed Media
10 am to 12:30 pm* $80 per term
(please note: class time has been extended)
Still life and Mixed Media
Acrylic Painting every Thursday evening
6:30 pm to 9:00 pm $80 per term
Still Life (class full, wait list)
6:30 pm to 9:00 pm $80 per term
Still Life (class full, wait list)
Second Sundays 1 p.m. to 4 p.m.
Visual Journaling with collage and mixed media
Drop in $20 Details at:
http://journalingpaperandpen.blogspot.com/
Visual Journaling with collage and mixed media
Drop in $20 Details at:
http://journalingpaperandpen.blogspot.com/
PCC Workshops
Travel Sketching
Saturday, April 26
Sylvania Campus
Saturday, April 26
Sylvania Campus
Beginning Acrylic Painting
Saturday, May 10
Sylvania Campus
Saturday, May 10
Sylvania Campus
For
more details contact PCC at 971-722626
online: www.pcc.edu
online: www.pcc.edu
Sketching the English Village
Registration closing: April 25, 2014
For more information go to:
English SketchingWorkshop
Registration closing: April 25, 2014
For more information go to:
English SketchingWorkshop