Wednesday, December 2, 2015

Pen & Ink Part II: Pens and Paper


Drawing is like making an expressive gesture with the advantage of permanence.

Henri Matisse (1869-1954)

When it comes to permanency, ink drawing tops the list. There really isn’t much room for error, although there are ways to fix things when necessary. So why do I keep on working with ink? I just love the look of finished ink pieces. But more importantly, I love the feel of a good, solid dip pen in my hand and the variety of marks different nibs make.

Of course, I still work with technical-like drawing pens, such as Micron, Copic and most recently Le Pen Drawing Pens. It’s a bit inconvenient to work with dip pens outside or when traveling, although I’ve been known to carry my small traveling ink bottle with me.

Last issue I covered the dip pen at length. Now I’d like to discuss the drawing pen. Today there are so many different pens on the market; it’s a struggle to know which one is best. And all of them have different standards for their nibs.

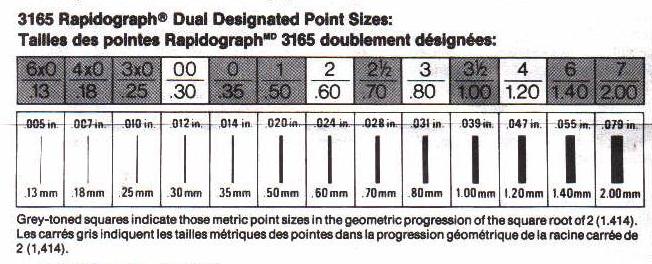
Below you can see a diagram of the different points sizes and their “weight” for the Rapidograph pen (one in which I will discuss in this article). Most drawing pens have numbers on the top side of the cap. The numbers represent the weight or width of the line created by that pen.


*************************

I’m going to discuss four of my favorite pens, not that they are the best: 
  • Koh-I-Noor’s Rapidograph® technical pen
  • Sakura Pigma® Micron® pen
  • Copic ®Multiliner SP
  • Le Pen® Technical Drawing Pen


Koh-I-Noor’s Rapidograph® technical pen
Back in my advertising days (before the computer did all our work), artists used the Rapidograph pen by Koh-i-noor. They were not only extremely expensive but also a bit finicky, always seeming to clog up. In the past few years, the company has repackaged them (so to speak) and is now selling them as Rapidosketch, although you can still get the original pens.

I have had my struggles with these pens, to say the least. Finally this summer I took my three pens (one Rapidograph and two Rapidosketch) and soaked them in Windex®. Amazingly, I was able to get them unclogged and effectively working. They are still going strong to this day. Who would have thought Windex would do the job.

Pictured below, you can see my three pens. What’s nice about them is that you fill the ink cartridge and start inking. With others you have to buy a replacement cartridge or throw the pen away when dry.


Below is an illustration of the pen’s parts from Koh-i-Noor. Be careful when cleaning these pens. It’s easy to lose a part down the drain. The process can be very, very messy.

Expect to shell out some bucks on this pen. One Rapidograph pen goes for $25-$35 and the Rapidosketch costs around $18.

Sakura Pigma® Micron® pen
I have to say that for years the Micron pen was my workhorse. The pen is reliable (hundreds of students have used them in my art kits), easy to use, with consistent ink flow and offers several nib sizes. They are a throw-away though. So when they are dry, they are worthless. The good news is it takes a long, long time to dry up. As I said, students in my classes and workshops have used these for several years and they are still kicking.

Here’s a photo of a Micron pen set with following nib sizes: 0.20mm, 0.25mm, 0.30mm, 0.35mm, 0.45mm and 0.50mm respectively. Depending on what I am drawing, I usually stay with the 0.35mm and 0.50mm. The best way to find out what you like, is to go to an art store that sells these pens separately and try them on a scrap of paper, if allowed.

Obviously, the larger the number on the pen, the larger the line will be. I personally don’t like working with 07 or 08 nibs unless I am covering a large area, such as a background. Most Micron pens sell for around $2.50 each.

Copic ®Multiliner SP
About four or five years ago I ran across the Copic Multiliner technical pen. It comes with a metal shell, replaceable nib and a cartridge. At times, I have really found these pens to be wonderful and then sometimes a bit frustrating. 

To keep the ink ready to flow (at least for me), I must store the Copic pens in my pen holder with the cap headed downwards. I used to just put them in my holder with the head facing upward. After all, the numbers are listed on the cap (also along the barrel), so it was easier for me to grab the right size that I needed. But after a while, the ink struggled to get flowing. One of the sales clerks where I purchased it (and a big fan of Copic) recommended the downward placement and it worked. These pens also come in a variety of nib sizes as you can see from the chart listed below.

Here’s a chart created by Jerrysartarama.com for the Copic pen:

Below, I’ve pulled apart a Copic pen so you can see its different parts. You can purchase the refills and nib replacements at some art stores and online. The pens cost around $10 with refills available for around $2.50.


Marvy Le Pen® Technical Drawing Pen
I have been using the Le Pen fine line markers for sometime, but not their technical pens. These came out a few years ago and I was drawn to them because they were only $1.59 each (online). Most of the other pens are $2.50 or more (way more for Rapidographs as we saw above). I have seen these pens at brick and mortar stores going for $1.99 to $2.50. It pays to check around. Below is a chart created by jetpens.com to illustrate pen width.


****************

What paper to Use
Last but not least, we need to talk about paper. Generally I recommend Bristol paper that is smooth—a good, inexpensive choice is Strathmore. In the art shop you will see a few choices. 

Please, please do not buy a vellum surface, which is bumpy. You want a smooth or what is also called a plate surface.  I’ve used Strathmore for years and have found it to be very sturdy and heavy enough for wet media; that is, if you want to add some watercolor or colored ink to your project. But here’s a word of warning regarding watercolor— because the paper is made from wood pulp, the paint will not act the same as if it were on 100% cotton watercolor paper. It just takes some experimentation and practice.

Another alternative, especially when you are first learning, is to purchase some laser paper at your stationery store. It’s smoother than a baby’s bottom and a great place to make lots of mistakes.

Simply put, there’s nothing like placing your pen—dip or technical—on smooth paper and feel the gliding motion. Most comic and manga artists use either a Bristol paper or Deleter comic book paper, another good choice.

I do not recommend highly fibrous paper, especially for dip pens. The technical drawing pens can tolerate watercolor paper much better. With textured paper, your nib can catch some of the fiber, which can even get stuck in between the tines. Not a pleasant experience.

So there you have it. Hopefully I’ve given you some valuable information on what to purchase when diving into pen and ink. Next month, part three and the final in this series, I will talk about techniques. If you want to experience pen and ink first-hand, check out this Saturday’s workshop in my studio at http://www.jillgoodell.com/workshop.html.


For hints or tips on drawing and painting go to:

Thursday, October 22, 2015

Pen & Ink Part I

Issue #79


Creating fun art with dip pens

During the past few weeks I've been holding a pen and ink drawing class in my studio. Instead of using the portable ink pens that are popular these days, such as Micron or Copic, we've been using dip pens. I personally love using them. Most people don't consider the dip pen for drawing, perhaps it's because they think these pens are for calligraphy.

But I'm here to tell you that dip pens are perfect for drawing. They may seem out of fashion, but they are alive and well today. Artists who render comics, especially Manga, use them all the time. Why? Their flexibility is amazing and you can get exceptionally thin lines, depending on the nib you use. But I'm getting ahead of myself. Let me first give you some technical information, starting with the the pen's history.

A brief history
The process of creating the quill pen
3quills by Jonathunder - Own work.*
Up to the Dark Ages, scribes used reed pens. Then came along a new invention: quill pens created by pulling the top feathers from a bird's wing, burying it in the sand so the point would harden and then shaping it into a pen point with a knife. This continued for 1500 years. Many of our documents from the Magna Carta to the Declaration of Independence were penned with these instruments. Interestingly, the quill pen needed to be "sharpened" frequently and usually didn't last more than a week. It's said, that Thomas Jefferson raised his own geese to keep him in the ink (so to speak).

The hardest part was catching the birds. Goose feathers were most popular and the swan feather was considered best of all. The crow had the honor of having the best feather for drawing. At one time, Britain imported 27 million quills from Russia per annum.

Although there is evidence that the Egyptians used metal tips (or nibs), it wasn't until the late 1700s when the steel nib was invented for "modern" use. A man named John Mitchell bought an expired, steel nib patent and started to manufacture them on a massive scale in 1822. Steel nibs were an immediate hit because they:
  • lasted longer,
  • were uniformly made,
  • no sharpening necessary, and
  • easy to make, thus affordable.
Some say that the nib pen actually increased literacy because now everyone could own a pen and learn to write. 

*Licensed under CC BY-SA 3.0 via Commons - https://commons.wikimedia.org/wiki/File:3quills.jpg#/media/File:3quills.jpg

Are they called dip or nib pens? That depends.
Actually, these pens are called either dip or nib. Most comic artists refer to these pens as nib pens; the rest of us call them dip. It really doesn't matter. Both are correct.

Generally speaking, you do not have a reservoir in a nib as you would in a fountain pen. To recharge your nib, you dip it into an ink well or bottle. A lot of illustrators don't bother dipping at all but instead use eye droppers, syringes or brushes to fill the nib with ink. There is also a handy little tubular reservoir you can purchase that clips onto the nib, which gives you more time to draw between recharging. Depending on the nib you use, it truly is surprising how long one ink charge lasts.

The Nibs
Just like with any other art medium, there are lots of stuff you can choose from. For instance, there are a variety of nibs. On the American side, I like Speedball/Hunt No. 512 and  No. 513.


(From Dick Blick site)
The 512 is considered extra fine and the 513 is called the globe or bowl. Both hold a goodly amount of ink with the 513 holding a bit more, which means you have a longer time to spend drawing instead of dipping.
(From Dick Blick site)

For extra fine work and nib flexibility, you can purchase the crow quill. You can easily identify these nibs because the shank looks like a crow's feather quill or calamus. There are several to choose from but I prefer the Speedball/Hunt No.102 and Speedball/Hunt No. 107. The 102 is highly flexible, which means you can put pressure on the nib while drawing and create thicker lines. The 107 is stiffer and creates a very lovely fine line, but is not as flexible as the 102.

Another good source of quality nibs comes from Japan. As we all know there is an explosion of work being done by Japanese designers and comic makers. Several great products have come from their shores in the last decade or so from the waterbrush to great pen holders and nibs.

Similar to the Speedball/Hunt 512 and 513, you can find the Nikko Saji No. 357 and the Zebra G. I prefer the G over the Saji because I can get my lines so thin they look like strands of loose hair. There also nibs that are similar to the crow quill, which are called Maru nips or mapping nibs. I like the Nikko Comic Pen, but my biggest preference is Zebra Comic because it is less flexible (the tines don't spread apart easily) than the Nikko product and again, I can create wonderful thin lines.


(From Jet Pens site)

Of course there are many other nibs to use, but these are the ones I use the most. 

The holders
One can't get anywhere with just the nibs. You must have a holder. The standard ones I use are through Speedball. However, if you are going to use the Japanese nibs at all, I would suggest getting a Deleter nib holder. The Japanese nibs are made just a hair thinner, so they fall out of the standard holder. Plus, the Deleter holder accommodates both the crow quill (maru) and the standard nib. So it's like getting two holders in one.


(From Dick Blick and Jet Pens sites)

If you want to get started right away, you can purchase online, through Dick Blick or Amazon, a Speedball sketching set that has several nibs and the two pen holders:
(From Dick Blick site)


  • 2 Plastic Pen Holders
  • 1 #56 Standard School Nib
  • 1 #99 Standard Drawing Nib
  • 1 #102 Crow Quill Nib
  • 1 #107 Stiff Hawk Crow Quill Nib
  • 1 #108 Litho Crow Quill Nib
  • 1 #512 Bowl Pointed Nib


India Inks
And now for the fun part. During the past ten years while I've been working with ink, I've noticed a color change. I usually stick with Black India Ink, either the Higgins or Speedball brands. Both have been around forever it seems. Then one day I noticed the Winslow-Newton brand with cute little jars of color. I purchased them, but the colors really didn't wow me. 

©2015 Jill Jeffers Goodell
Colored Inks
While performing demonstrations at Art Media (a local art store in Portland, Ore., now defunct), I ran across Liquitex acrylic inks. Oh my goodness, things changed from that point forward. They are rich in color, permanent (very important), non-clogging, fast drying and best of all, can be used like a watercolor when diluted. They have 30 colors.

The other acrylic ink brand is FW by Daler Rowney. They offer 38 colors and react the same as any other acrylic ink. The difference between them, and others, is that they have process yellow, process cyan and process magenta--the three colors I like to use for mixing.  As you all know, my watercolor and acrylic paintings are only done in these three colors and I find the same joy with the FW inks.

Not long after I learned about the acrylic inks, I ran across the Dr.Ph.Martin's Bombay colored India ink. Wow! I must have died and gone to art heaven because they are even more fun. They too are permanent, colorfast and dilutable. The colors are brilliant and they are cheaper in price than the other colored inks.

Still an India ink girl
While I enjoy playing with the colored inks for highlights, in my journals, collages and so on, you'll find me using the India ink and dip pen to create my ink drawings. Perhaps it's just a habit. I suspect though that when I work with my ink, I really use a lot of it and I feel there's not space for color. 

Here are some of examples that I've done in our pen and ink weekly class. The process is slow, but rewarding. I will most likely color the top corn picture. To do this I will copy the picture onto Bristol or some study cover stock and then paint it, leaving the original alone (as I've done for the ink bottles drawing above). 


©2015 Jill Jeffers Goodell
For the second picture, I think I will leave it alone except for adding a bit of red in the birds' eyes for dramatic effect.


©2015 Jill Jeffers Goodell
When to color depends on how much ink you have on the page and/or what do you want to emphasize. The picture below (and from the top) was done awhile ago. It began as watercolor, then I added ink and splattered color on top. The upper leaves were done in colored India ink and then painted over with watercolor. Very versatile.


©2015 Jill Jeffers Goodell
But that's not all folks
There's more to learn about pen and ink, which I will cover in next month's issue, including paper choices, line techniques and applying of washes. Hope to see you then.

****************************
For information on Glastonbury Studios classes and workshops, 
please go to my website: www.jillgoodell.com.

Happy Halloween!