Thursday, August 25, 2011

September Newsletter: Drawing the Hand

Note: This newsletter is a little early this month, as I'm taking a group of students on a travel sketching cruise to Alaska. I won't be back until after the first of September. Hope you enjoy this month's topic!
One of the easiest parts of the body to draw is the hand. That's because we can see one while we draw with the other. In my beginning drawing class I have asked students to draw their hands using blind contour--looking only at the object and then drawing it without looking at the paper. It's hard, and most people get a kick out of what appears on their paper. With enough practice, one can get rather good at drawing blindly.
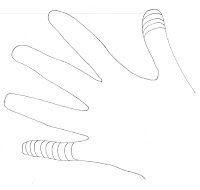

Then I ask everyone to trace (the only time I allow my students to trace anything) their hand and draw contour lines (like ones used on a topographical map), as illustrated here. Eventually, your hand looks like it's wrapped up mummy style, but it also shows how the hand begins to form right before your eyes.


Finally draw your hand as you would usually.  I like using cross-hatch marks when I do this. It's fun to use all sorts of drawing marks to create a hand.


As everyone knows I see shapes inside objects first. With the hand I see several rectangles, connected by balls (knuckles) and then all connected to a big square (the palm). I was recently reading one of Andrew Loomis' books, Drawing the Head and Hands, which you can download at http://illustrationisland.files.wordpress.com/2010/01/andrew-loomis-drawing-the-head-hands.pdf.  He uses the same idea, using first the rectangle, which turns into cubes. Below are several of his illustrations of hands:
Notice how he uses cubes to define fingers.
The palm and back of the hand
The tapered hand
The baby's hand
Drawing hands is a fun activity, one which you can do anytime, anywhere because you always have that free hand to serve as your model. Why not do a study or two of them this coming month.

Here are three more hands that I've done recently.


Next Month: Drawing from photographs


Fall Classes at Glastonbury Studios Start Week of September 11, 2011
Pre-registration required. Seating is limited.

All students must pre-register for classes. Please email me at jjgoodell@gmail.com to get your form and instructions for the following classes.
  • Tuesday evenings (7-9)  Drawing: People and Perspective
  • Wednesday mornings (10:00 to 12:30) Sketching (Landscape)
  • Thursday evenings (7-9) Acrylics (Abstract, Collage & More: beginning to intermediate) 


Travel sketching plans for 2012 
Workshop payment due October 1st
Mediterranean Cruise: Looks like we have room for four more people for the cruise, planned for May 22-28, 2012. For more information go to the trip blog. 

Wednesday, August 3, 2011

August 2011 Foreshortening

Foreshortening is hard.  But, I think it’s mostly a head thing.  We want to draw what we know, not what we see. According to the Artcyclopedia glossary, foreshortening is defined as the following:
“A way of representing a subject or an object so that it conveys the illusion of depth — so that it seems to thrust forward or go back into space. Foreshortening's success often depends upon a point of view or perspective in which the sizes of near and far parts of a subject contrast greatly”.

The old recruitment poster of Uncle Sam is a perfect example of foreshortening:


Notice his forefinger and thumb? Look in the mirror and point your finger at yourself like Uncle Sam. Notice the “shapes,” not the fingers. That is the key to foreshortening, drawing the shapes you see before you, rather then what you know is before you.
It's amazing how many times you will see objects in a foreshortened manner, from flowers to animal snouts. But the most difficult, I think, is when it appears in human form since we are so familiar with what "should" be. Take for instance the painting, Lamentation of Christ by Andrea Mantega (1431-1506).


Notice Christ's feet. Now compare those feet with his head. If drawn correctly the feet would be much larger since they are closer to us, but Mantega painted both almost the same size. While I think this was his intention, Mantega gives us an excellent example of how tricky foreshortening can be. Don't believe me? Have a friend or even one of your kids lay down on a bed with his feet directly in front of you. Then measure the height of the feet against the height of the head. There's a big, big difference!


There is a wonderful book I'd like to recommend, entitled, Atlas of Foreshortening: The Human Figure in Deep Perspective (Second Edition), by John Cody. This book is filled with photos of models in foreshortened positions. I have been trying to get through the book myself in my spare time, drawing each model. It's a challenge.


Here are a couple of my drawings from the book: 
Next month: Drawing hands

What's ahead!
New Glastonbury Studio class sessions to begin week of September 11, 2011.
Just want to remind everyone that a new session will begin for my private classes during the week of September 11. We'll be covering the following media and/or topics:
Tuesday evenings (7-9)  Drawing: People and Perspective
Wednesday mornings (10:00 to 12:30) Sketching (outside, depending on weather)
Thursday evenings (7-9) Acrylics (beginning to intermediate) 

Travel sketching plans for 2012 
Mediterranean Cruise: Looks like we only need one more person to make a complete group for the cruise, planned for May 22-28, 2012. For more information go to the trip blog.

Palm Springs: We will again take a trip down to Palm Springs for a long weekend in February. Details to come soon.

Fall Foliage: Instead of going to Alaska next fall, I'm thinking about a cruise to the New England area to see the fall foliage. Details to come soon.
Until next time...have a great summer!